Feeds:
Posts
Comments

Archive for the ‘Recipes’ Category

cranberry-applesauce

Isn’t it a pretty color?

I don’t remember when I first made this pretty side dish, but it became an instant hit. Sweet and tart, and it makes the kitchen smell so good while it is cooking. It wasn’t long before I was bringing it to Thanksgiving every year, and I make it occasionally in the off-season and have more than once made a huge batch and canned it.

It is a bit labor intensive; there’s lots of standing over the stove and stirring. I tried roasting it in the oven once (which is how I make my regular applesauce when I’m making a big batch for canning) and the results were not nearly as good.

I almost always double, and sometimes triple or quadruple this batch. Because fresh cranberries are often only available in October and/or November, I grab several bags and throw them in the freezer to have on hand all year.

Some people prefer this warm; I will eat it warm, but prefer it cold from the frig.

Cranberry Applesauce

  • 1/2 cup sugar
  • 2 Tbsps. water
  • 4 cups chopped apples
  • 1-1/2 cups fresh or frozen cranberries
  • 1/2 tsp. ground cinnamon
  • 1/2 tsp. ground ginger
  • 1/2 tsp grated lemon peel (I rarely have this, and often just dash in some lemon juice)

In a large saucepan, heat sugar and water over medium heat until sugar is dissolved, stirring occasionally. Stir in apples, cover and cook for 5 minutes, stirring several times. Stir in cranberries; cook and stir for about 8 minutes or until cranberries begin to pop. Cover and cook 5 minutes more or until apples are tender, stirring several times.

Add cinnamon, ginger and lemon peel. Cook and stir about 5 minutes. Remove from the heat; mash until texture reaches desired consistency.

Read Full Post »

smoked whole chicken

Smoked, brined chicken. Isn’t it a lovely color?

The first time I brined a chicken, it was an act of desperation. I had purchased a couple whole chickens at a good price, and we have a great roasted chicken recipe. But with more than one, there was no way we needed to cook both, so one went into the deep freeze. (I’ve mentioned I love my deep freeze.)

One thing I have never – never – had luck with is thawing a whole chicken. (Here are the USDA’s guidelines for safe thawing.) Everything I’ve read says a 3.5 pound chicken should thaw in your refrigerator in a day. I tried that. It was most definitely still frozen, even after two days or three. I got frustrated with cool water methods. (What a waste of water!)

So I decided to brine the chicken in the frig for 48 hours. I figured unlike most cool water methods, where you keep the chicken in its plastic bag so the water doesn’t touch it, the brine is allowed to penetrate all the cavities in the chicken, allowing warmth to seep in everywhere.

What do you know, it worked! Not only did my chicken thaw completely in far less time than all my other attempts, it was the tastiest, juiciest, most tender bird I’d ever roasted. This is what I posted to Facebook:

“If you’ve never brined a chicken before roasting/grilling it, DO IT! I did it Saturday out of desperation since the chicken did not get taken out of the freezer. We roasted it today in the usual way, and it was wonderful!”

I’ve since tried brining for only 24 hours, and if I recall correctly, my bird was completely thawed then, too. Hooray! I get a thawed bird AND tastier chicken? That’s a win! I brined my Christmas turkey, and that, too, got raves.

A few years ago, my husband took up smoking meats as a hobby. What a tasty hobby! We’ve enjoyed several experiments over the years, and I’m sure I’ll share a few of them with you, but one of our daughter’s favorites is Dad’s smoked chicken. “It doesn’t even need ranch dressing!” That’s a high compliment in our house!

Brine for Chicken

  • 1 gallon cold water
  • 1 cup kosher salt
  • 1/2 cup sugar (or brown sugar)
  • Added flavorings (try rosemary and sage, or whatever suits you!)

Dissolve salt and sugar in water in a large ziptop or other food-safe plastic bag. Add flavorings as desired. Place your chicken in the bag, making sure all cavities are filled with water. Seal bag tightly and place in a deep bowl in the frig overnight.

Drain brine. Pat chicken dry and cook as usual. (Roast, grill, smoke, you name it!) Enjoy!

Read Full Post »

We love this tasty dish from Practical Paleo, but I despise making meatballs. The process is just tedious and messy. So I’ve found a way to maximize output and minimize mess – at least how many times I have to make a mess.

This meatball recipe uses nuts and veggies as the binder for the pork as opposed to eggs or breadcrumbs. The result is a sneaky way to get a little extra nutrition and fewer carbs. The original called for cooking these tidbits in a skillet first, but we found we actually prefer the bit of crunch from not cooking them ahead. (Not to mention having one less dish to wash!)

Here are my meatball tips:

  1. I double the batch. This means I’m making this family favorite once but getting more than one meal.
  2. I use my cookie scoop/melon baller to measure out the meatballs. This ensures they are the same size without a lot of guesswork.
  3. I put enough in a pan for dinner. The rest go on a cookie sheet to freeze. After being frozen, I put them in a freezer container and label. From there, I only pull out what I need for the next meal and bake as usual.

Thanksgiving Stuffing Meatballs

meatballs and corn

Thanksgiving stuffing meatballs with corn on the cob. Yummy!

  • 2 lbs ground pork
  • 2 Tbsps. Italian Sausage Spice Blend (recipe below)
  • 1/4 cup onion, finely chopped*
  • 1/4 cup celery, finely chopped*
  • 1/4 cup carrot, finely chopped*
  • 1/4 chestnuts, walnuts, pecans, finely chopped*

*I put all these ingredients in my mini food processor. Speeds up the prep time.

Preheat oven to 425 degrees.

In a large mixing bowl, combine pork and spice blend until will combined. Then combine onion, celery, carrot, and nuts with the meat mixture until well combined.

Form into 1-inch meatballs. Place in an oven-safe dish or on a baking sheet and bake approximately 25-30 minutes or until cooked all the way through.

To use frozen meatballs: Place as many as you need on a baking dish or baking sheet and bake at 425 for 30 minutes or until cooked through.

Italian Sausage Spice Blend

  • 1 tsp sea salt
  • 1 Tbsp. fennel seeds, ground
  • 1 Tbsp. ground sage
  • 1 Tbsp. garlic powder
  • 1 Tbsp. onion powder
  • 1/4 tsp. white pepper (or 1 tsp. black pepper)
  • 2 tsps. dried parsley (optional)

*I mix up a big batch of this (like, triple) and keep it on-hand in my spice cupboard. I tend to leave out the fennel, and it is still tasty. You can use 2 tablespoons of this per pound of meat to make sausage.

Read Full Post »

spaghetti squash bolognese

A new favorite? Spaghetti Squash Bolognese

Have you ever had a favorite recipe you suddenly didn’t like anymore?

For as long as I can remember, my favorite food has been spaghetti with meat sauce. I devoured it. I used to eat a portion larger than my father’s – when I was eight!

Mom’s meat sauce was simple and convenient: ground beef, a jar of spaghetti sauce, and a package of seasoning mix. It was a regular meal, at least every two or three weeks. I mean, it was so easy to make, and it was my favorite food.

Until it wasn’t. *frowny face*

Something happened while I was pregnant with Baby Number Two. My tastes started changing. At first I thought it was the day; you know, how something just doesn’t taste good to you that day. But after a few more times, I knew that wasn’t it. So then I thought maybe my preferred spaghetti sauce had changed its formula.

I think we tried five or six or more different brands and variations of jarred spaghetti sauce, trying to find something that suited me. I could still eat it, but in much smaller amounts. My girls, who had always eaten it, were now ALSO turning their nose up at it. Therefore, we were not eating up the leftovers, and not really enjoying our meal.

I’ve mentioned before my husband’s desire to go paleo. Our favorite paleo cookbook features a great recipe for Spaghetti Squash Bolognese. We’d made it several times and liked it very much. We’ve always served it over squash, as in the recipe, but I thought I’d give it a go over pasta.

Well, I now have my new go-to spaghetti sauce recipe.The combination of meats and the thick sauce are savory and satisfying. Unfortunately, it is not nearly as convenient as the previous version, so I’m planning to make it in large batches, freeze some, and maybe experiment with the crockpot.

If you’ve ever had an old favorite turn into a least favorite, why did it happen and what did you do?

Also, if you have a simple, tasty spaghetti sauce recipe, please share!

Spaghetti Squash Bolognese

  • 1 medium spaghetti squash
  • 2 Tbsp. bacon fat or butter
  • 1 onion, finely diced
  • 1 carrot, finely diced
  • 1 stalk of celery, finely diced
  • 1 glove of garlic, finely diced
  • 1/2 lb. ground beef
  • 1/2 lb. ground pork
  • 4 slices bacon, chopped
  • 1/2 cup full-fat coconut milk (you could try whipping cream. If you do, let me know how it goes!)
  • 3 ounces (1/2 small can) tomato paste (I measured this at 6 Tbsps.)
  • 1/2 cup dry white wine or chicken broth
  • sea salt and black pepper to taste

Preheat oven to 375.

Slice spaghetti squash in half lengthwise so that two shallow halves remain. Scoop out the seeds and inner portion of the squash, sprinkle with seas salt and black pepper. Place both halves face down on a baking sheet. Roast for 35-50 minutes until the flesh of he squash becomes translucent in color and the skin begins to soften and easily separate from the “noodles” that make up the inside.

Allow the squash to cool enough so that you can handle it, and then scoop the flesh out from the inside of the skin into a large serving bowl. Set aside until the sauce is finished.

While the squash bakes: in a large skillet over medium-high heat, melt the bacon fat or butter, and saute the onions, carrots, and celery until they become translucent. Add the garlic and cook for an additional minute.

Add the ground meats and bacon, cook until browned through. Once the meat is done, add the coconut milk, tomato paste, and white wine/broth. Simmer over medium-low heat for 20-30 minutes or until the sauce is well combined.

Add sea salt and black pepper to taste before removing he sauce from the heat. (This is essential! I learned the hard way that you need to taste and then season. The sea salt makes ALL the difference in this dish.)

Serve sauce over roasted spaghetti squash.

Read Full Post »

Turkey Apple Cheddar Salad

Simple and tasty – Turkey Apple Cheddar Salad

You can’t get much simpler than this. A few years ago, I was scouring cookbooks for new recipes when I found Turkey Apple Cheddar Salad. It was a hot summer, and we were often going to picnics in the park to enjoy the Thursday Night music.

This salad is like a salad you’d get from your local deli. Chunks of fruit, meat and cheese are also kid-pleasers. My youngest loves it. She’s adorable when she eats it. She takes a bite of turkey. “Turkey.” She takes a bite of apple. “Apple.” She takes a bite of cheddar. “Cheddar.” Pause. “Salad!”  She chants this the whole time, eating it in pattern. I better have about the same amount of everything on her plate!

My oldest prefers it without the dressing, and sometimes we just cut up the ingredients into slices and eat them on crackers. 🙂

The original called for green onions and some cooked pasta, but I found the pasta didn’t add anything and the onions tended to fall to the bottom of the salad and not get eaten at all, so I started leaving them out.

I’ve learned to keep the apples out of it until the last minute so they stay crisp. I suggest not making ahead more than one day, or the apples will get soggy. It doesn’t keep particularly well, so plan to eat it within a day or two. I like to cut up the turkey and cheddar, and then cut apples into it as needed.

Turkey Apple Cheddar Salad

  • Oven roasted or smoked turkey breast (not sliced)
  • Block of cheddar cheese (we prefer sharp)
  • Medium, crisp apple(s) (like gala)
  • Poppyseed dressing

I don’t have a very scientific way of making this salad. I cut the turkey, cheddar, and apple into 1/2 inch cubes, and toss them into a bowl until the proportions look right. (A little more turkey than cheese, a little more cheese than apple.) Then I stir in enough dressing to coat it.

That’s the beauty of this meal; you can make only what you need! It’s great for just one person, or make a big batch to take to a potluck. Round it out by putting it on a bed of salad greens and adding a piece of crusty bread, if you like.

Read Full Post »

orange teriyaki chicken salad

Colorful salad with chicken, oranges, and salad greens.

When I was first married, I didn’t have an arsenal of recipes at hand, so I used to cut zillions of them out of magazines. (I still do, but I no longer cut out dessert recipes unless they look exceptional.) One of the recipes I cut out was for Orange Teriyaki Chicken Salad.

It was long a favorite for my husband and me, but we haven’t made it in a while. The kids aren’t big salad eaters, but by keeping the chicken and oranges separate and just putting  a little ranch dressing on the greens, they ate most of their meal without complaining.

The original recipe called for peeling fresh oranges, juicing one to get juice to mix with teriyaki sauce for dressing, and carefully segmenting the others. I found this a tedious process; I hate peeling oranges, as I despise pith and membranes. Solution: canned mandarins, just using straight teriyaki sauce for dressing.

Orange Teriyaki Chicken Salad

This recipe can be made for just one or two people, or multiplied for several. I also don’t measure much anymore when I make it, so this is a bit of a guess.

  • 1 (4-ounce) boneless, skinless chicken breast half per person
  • 3 Tbsp. teriyaki sauce per person for marinating, plus more for dressing.
  • 1/2 of one (8-ounce) can of mandarin oranges per person, drained
  • 1/2 – 3/4 cup salad greens (we like fresh spinach or torn romaine) per person.
  • 1 Tbsp. slivered almonds per person.

Make ahead: One day before you want to make this recipe, put the chicken and teriyaki sauce in a resealable plastic bag or a small container. Marinate for at least 8 hours. (I highly recommend Soy Vay’s Veri-Veri Teriyaki. So yummy! And no, I didn’t get paid to say that!)

Day of: Grill or broil the chicken over high heat until a thermometer reaches 160 Degrees F. or juices run clear. Allow chicken to rest 5 minutes. Meanwhile, arrange salad greens, mandarin oranges, and almond slivers on a plate. Slice the chicken into bite size pieces. Top salad with chicken. Drizzle with teriyaki sauce.

For kids (my kids, at least): Serve chicken, with mandarin oranges as a side dish, salad with dressing as a side dish.

Fun twist: I have also served this salad as kabobs, arranging chicken and oranges on skewers. I would probably use fresh oranges rather than canned.

Read Full Post »

I never ate spinach as a kid. Never! When I got to college, I started eating it in fresh salads, as I didn’t mind it raw, and I’m sure I started getting it cooked in certain dishes once in a while.

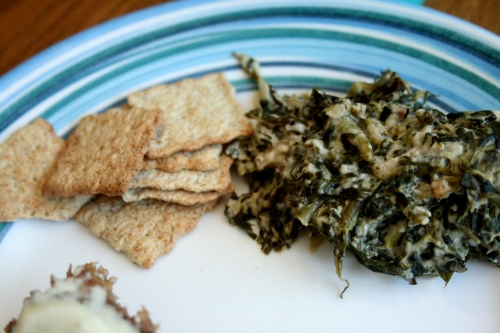
This spinach casserole was my sister-in-law’s regular recipe that she brought to dinner. And surprisingly, I like it! Now that I have kids of my own, we eat it regularly. Why? Because my kids will eat it! They don’t care for it fresh from the oven, but cool it off a bit, and they will eat it as a dip on crackers. (It is admittedly very tasty on crackers.)

So feel free to dig in with your favorite party crackers, pretzels, celery/carrots, or just with your fork!

spinach casserole

Amy’s Spinach Casserole

  • 2 (10 ounce) packages frozen chopped spinach
  • 1 (8 ounce) container sour cream (or 1 cup sour cream)
  • 1 can cream of mushroom soup
  • 1 package of onion soup mix

Thaw the spinach. (I often follow the cooking directions and cook it in the microwave with a little water for about 5-8 minutes). Squeeze it dry. Squeezing it dry is essential to getting a good final product that isn’t runny. How to do this: Especially if it is hot out of the microwave, the spinach is a bit hot to handle. I line my colander with paper towels, dump the spinach in, and then take a clean drinking glass and press down on the spinach all around in the colander until very little liquid comes out.

In an oven-save bowl or casserole dish, mix spinach, sour cream, soup, and soup mix together until well blended. Level the top of the mixture in the bowl. Bake in a 350-degree oven for 30 minutes.

Enjoy!

Read Full Post »

campers breakfast hash

Potatoes and eggs are super yummy in this skillet meal.

Who doesn’t love breakfast for dinner? I wasn’t sure how this one would go over, as my kids don’t particularly like potatoes, but they loved it!

Full of hashbrowns, sausage, eggs, and peppers, it is a nice all-in-one meal. The original recipe calls for a HUGE amount. I wasn’t sure my skillet would hold it all (nor if my family would like it) so I halved the recipe.

I felt the amount of sausage was skimpy, so I left it at about what the original called for, without halving it, and after making it, I feel it was skimpy on the veggies, too. I will continue to play around with this one. Try it and see what you think! What would you change?

Camper’s Breakfast Hash (Original amounts)

  • 1/4 cup butter, cubed
  • 2 pkgs. (20 ounces each) refrigerated shredded hash brown potatoes
  • 1 pkg. (7 ounces) brown-and-serve sausage links, cut into 1/2-inch pieces
  • 1/4 cup chopped green pepper
  • 1/4 cup chopped onion
  • 12 eggs, lightly beaten
  • Salt and pepper to taste
  • 1/4 cup shredded cheddar cheese

In a large skillet, melt butter. Add the potatoes, sausage, onion and green pepper. Cook, uncovered, over medium heat for 10-15 minutes or until potatoes are lightly browned, turning once.

Push potato mixture to the sides of pan. Pour eggs into center of pan. Cook and stir over medium heat until eggs are completely set. Season with salt and pepper. Reduce heat; stir eggs into potato mixture. Top with cheese; cover and cook for 1-2 minutes or until cheese is melted.

Read Full Post »

Crunchy Chicken Salad

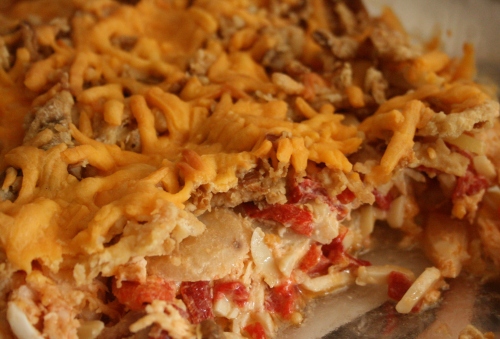
Crunchy chicken salad, baked in a casserole dish, is a tasty main course for lunch.

A friend of mine gave me this recipe after she used it for a lunch gathering. My husband and I enjoy it very much. The kids…well, the oldest pretty much just eats the chicken out of it, while the youngest turns up her nose. They can eat peanut butter sandwiches while hubby and I get a real meal.

(Mom confession time: I LOVE peanut butter. I love peanut butter sandwiches. I would eat peanut butter sandwiches every day if I could. That being said, I recognize the value of a diet rich in foods beyond peanut butter and bread. So I limit myself and my kids. But when I have to take a bag lunch? More often than not, it’s a peanut butter sandwich.)

This baked chicken salad is great on its own, or served in tortillas. I love the crunch of water chestnuts, and the contrast they provide with the chicken. I have reduced the mayonnaise from the original recipe, as I found that it was very runny. It also reheats and freezes well. I often double the recipe and freeze a pan without the topping. If you do that, thaw before baking.

Crunchy Chicken Salad

  • 2 cups cooked chicken breast, chopped
  • 1/2 cup slivered almonds
  • 1 cup sliced water chestnuts
  • 1 cup sliced pimentos
  • 1/2 tsp. celery salt
  • 1/8 tsp Accent Spice mix
  • 3/4 cup mayonnaise
  • 1 Tbsp. lemon juice
  • 1 small can French fried onions
  • 1/4 cup grated cheddar cheese

Mix together chicken, almonds, water chestnuts, pimentos, celery salt and Accent. Whip mayo and lemon juice; stir into chicken mixture.

Pour into a greased casserole dish (8×8). Top with onions and cheddar. Bake uncovered, at 350 degrees for 30 minutes.

Read Full Post »

IMG_3462

Raspberry Fool – Simple Summer Sweetness

If you’ve never heard of a fool – as in, a dessert, not a person who does foolish things – you are not alone. I’m guessing – and this is strictly speculation – sometime in the 1950s, the classic fool was replaced with Jell-o fluff, a concoction of whipped topping and flavored gelatin.

I found a cranberry fool in a cookbook, but never made it. However, a couple of years ago, I was looking for something to make on April Fool’s Day that would be fun and not prankish, and voila, I found a strawberry fool.

A real fool has REAL food in it. Three ingredients. THREE! And surprisingly little sugar – and I think you could easily reduce the sugar if you choose. I’ve made this recipe with strawberries. This time, I made it with raspberries, and it was a perfect summer dessert on a very hot day.

Raspberry (or Strawberry) Fool

  • 1 heaping cupped fresh or frozen berries, thawed (if large berries, like strawberries, chop them before measuring)
  • 3 Tbsps. sugar, or to taste.
  • 1 cup heavy whipping cream

Puree berries and sugar in a food processor. Refrigerate at least 2 hours.

Beat whipping cream until stiff peaks form. Gently fold in berry puree until mostly blended, leaving some swirls. Serve chilled.

Read Full Post »

Older Posts »